Squarespace
Have a Squarespace website that you want to connect with Commerce7? Follow the steps to get your website set up with the Commerce7 tools and widgets.
- Local Squarespace development (Recommended)
- Squarespace browser tools
You can preview a sample website set up with Squarespace: https://www.spectrawinery7.com/ (Configured through browser tools)
Please note that Commerce7 does not provide design support. If you need support outside of this documentation, there are 3rd party designers who offer paid support. For assistance, you can contact Sean at Gorillion Web Design: [email protected].
Local Squarespace Development
Follow these instructions if you're using Squarespace's local development tools. This is the recommended method to set up Commerce7 with Squarespace.
1. Add the Commerce7 Snippets
To use the Commerce7 tools, you must first include the Commerce7 CSS and Javascript snippets to every page of your site.
- Add the following above the closing
</head>tag.
<link href="https://cdn.commerce7.com/v2/commerce7.css" rel="stylesheet">- Add the following above the closing
</body>tag, updating the data-tenant="tenantId" with your tenantId.
Your tenantId will be the first part of the Commerce7 admin panel URL.
eg. For https://jason-demo-site.admin.platform.commerce7.com/, the tenantID is jason-demo-site.
<script type="text/javascript" src="https://cdn.commerce7.com/v2/commerce7.js" id="c7-javascript" data-tenant="tenantId"></script>2. Add the Basic Commerce7 Widgets
For the basic Commerce7 functionality, add the following tags to your page templates. Place each <div> in your file where you'd like the widget to appear. Read here for more information on the widgets.
Side Cart
<div id="c7-cart"></div>
Displays the ecommerce cart and allows the customer to check out.
Account Login
<div id="c7-account"></div>
Displays the account login link and gives access to the customer profile pages.
Page Content:
<div id="c7-content"></div>
Displays page content from Commerce7 such as products, Checkout forms, etc. For each Commerce7 page, Commerce7 looks at the URL and then outputs the appropriate content wherever this tag is placed on your page. (Learn more in step 4.)
3. Update Routes in Commerce7
Since Squarespace does not work with the Commerce7 URLs by default, you'll need to update some settings for the routes within Commerce7.
- In Commerce7, go to Developer > Front-end V2
- Edit the Routes
- Under Router Type, change to Hash
- Under Base Routes, update "Cart Page" and "Checkout Pages" (Typically, Commerce7 uses the URLs of "/cart" and "/checkout" for these pages, but since Squarespace already uses these for their own ecommerce tools, we need to use custom URLs instead.)
- Cart Page: /basket
- Checkout Page: /purchase
4. Create Commerce7 Pages in Squarespace
For all of the standard Commerce7 pages, specific URL routes need to be created. Commerce7 uses the URL to know which page you're on and display the appropriate content into the <div id="c7-content"> that you added in step 2. The page name can technically be anything, but the URL must match exactly how it is listed below.
-
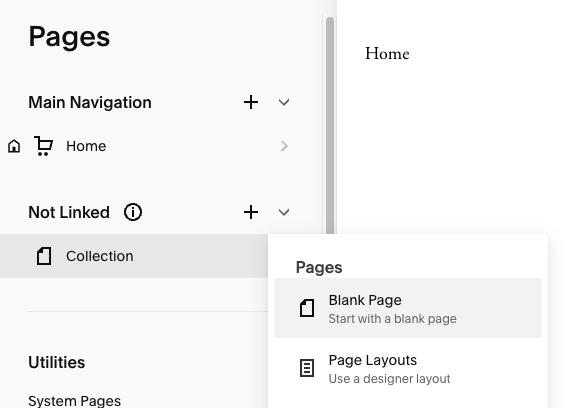
In your Squarespace account, go the Website > Pages section
-
Under the "Not Linked", click the "+" add a new page then click "Blank Page" for each of the following:

- Collection (Product lists + Collections, URL: /collection)
- Product (Product details, URL: /product)
- Profile (Customer account pages, URL: /profile)
- Basket (Ecommerce cart, URL: /basket)
- Purchase (Ecommerce checkout, club signup and reservation booking, URL: /purchase)
- Optionally, you can add the following pages. (For these, you can choose if you want them to display in your main menu by adding them under "Main Navigation" or "Not Linked".)
- Club (List of clubs, URL: /club)
- Reservation (Reservation booking form, URL: /reservations) (*optional)
Setup is complete!
If you want to override any of Commerce7's defaults styles, classes and variables can be overridden in your CSS. Learn more here.
To display products, you'll need to make sure that your product Collections are set up in Commerce7. When linking to a Collections page in Squarespace, you'll also need to add a "#" after the word "Collections" (as Squarespace URLs function a little differently).
ex. instead of "/collection/wines", use "/collection#/wines"
Tip: If you want to link to a Collections page in Squarespace, click to add a page and instead of selecting a page layout, at the very bottom click "Link", then add in your Collection URL.
Squarespace Browser Tools
Follow these instructions if you're using adding Commerce7 directly through Squarespace in your browser. Please note that this method isn't ideal and it will take longer to do, but it works if you are unable to access the local development tools.
You'll need a Squarespace account on the "Business" plan in order to use this method.
1. Update Routes in Commerce7
Since Squarespace does not work with the Commerce7 URLs by default, you'll need to update some settings for the routes within Commerce7.
- In Commerce7, go to Developer > Front-end
- Edit the Routes
- Under Router Type, change to Hash
- Under Base Routes, update "Cart Page" and "Checkout Pages" (Typically, Commerce7 uses the URLs of "/cart" and "/checkout" for these pages, but since Squarespace already uses these for their own ecommerce tools, we need to use custom URLs instead.)
- Cart Page: /basket
- Checkout Page: /purchase
2. Connect Commerce7 to Squarespace
You'll need to add a snippet of code in Squarespace. The code below will:
- Add the Commerce7 CSS and Javascript snippets, specifying which Commerce7 account to connect it to
- Add widgets to the page so that customers can access their profile and cart
- In your Squarespace account, go to Website > Pages and under Utilities, click Website Tools, then click Code Injection
- Add the following code under "Header":
<!-- Adds the Commerce7 styles -->
<link href="https://cdn.commerce7.com/v2/commerce7.css" rel="stylesheet">

<!-- Adds Commcerce7 widgets for the cart and customer account login -->
<script type="text/javascript">
    document.addEventListener('DOMContentLoaded', function(event) {
    var node = document.createElement('div')

    var accountNode = document.createElement('div')
    accountNode.id = 'c7-account'
    node.appendChild(accountNode)

    var cartNode = document.createElement('div')
    cartNode.id = 'c7-cart'
    node.appendChild(cartNode)

    var header = document.getElementsByTagName('header')[0]
    header.appendChild(node)
    })
</script>

<!-- Tells Commerce7 which account to connect to -->
<script type="text/javascript"
        src="https://cdn.commerce7.com/v2/commerce7.js"
        id="c7-javascript"
        data-tenant="tenantId">
</script>- Edit the code to complete setup and connect it to your specific Commerce7 account
- At the bottom, where it says data-tenant="tenantId", update "tenantId" to the name of your tenant.
- For example, if your Commerce7 admin panel URL is
https://jason-demo-site.admin.platform.commerce7.com/, you'll enter jason-demo-site. - It would then look like data-tenant="jason-demo-site"
- Lastly, where it says getElementsByTagName('header'), this adds the "Login" and "Cart" links to the end of the
<header>tag in the code. You can leave this as is, change it to a different tag, or instead usegetElementsByClassName('')to place via an element's class.
3. Create Commerce7 Pages in Squarespace
Now that Commerce7 and Squarespace are connected, you'll need to create a custom page inside of Squarespace for each of the standard Commerce7 pages. Each page displays a specific type of content from Commerce7. When a user is on a page, Commerce7 will look at the URL, and based on that, will display the appropriate content. The page name can technically be anything, but the URL must match exactly how it is listed below.
-
In your Squarespace account, go the Website > Pages section
-
Under the "Not Linked", click the "+" add a new page then click "Blank Page" for each of the following:
- Collection (Product lists + Collections, URL: /collection)
- Product (Product details, URL: /product)
- Profile (Customer account pages, URL: /profile)
- Basket (Ecommerce cart, URL: /basket)
- Purchase (Ecommerce checkout, club signup and reservation booking, URL: /purchase)
- Optionally, you can add the following pages. (You can choose if you want them to display in your main menu by adding them to the "Linked" or "Not Linked" section.)
- Club (List of clubs, URL: /club)
- Reservation (Reservation booking form, URL: /reservations) (*optional)
4. Add a Snippet to Each Page
For each page that you created above, in order for each to actually display content from Commerce7, you'll need to add a line of code. This line of code tells Commerce7 where to output the page's content.
-
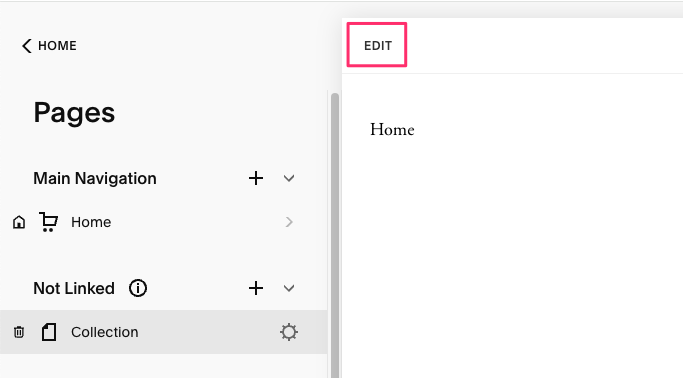
Click a page
-
At the top left click "Edit"
-
Click "Add Section" then "Add a blank section"
-
Inside that section, click "Add block" and search and click "Code"
-
Double click on the box that popups up, paste
<div id="c7-content"></div> -
Click "Save" on the page content and you're done!
-
Repeat for each/all pages that you added in the previous step.
5. Displaying products in Squarespace
- To display products on your Squarespace website, you'll first need to make sure that product Collections are set up in Commerce7.
- Once the Collection is added in Commerce7, there will be a URL listed. Copy the URL.
- In your Squarespace account, under Pages, click "+", then instead of selecting a layout, at the very bottom, click "Link".
- Enter a name and paste your Collections URL.
- Edit the URL, adding a "#" after the word "collection"
- URLs work a little bit differently in Squarespace, so when using the Collection URL, you'll need to add a "#". ex. for "/collection/wines", will be "/collection#/wines"
- Click "Save"
Setup is complete!
The Commerce7 tools should now be working on your website!
Since we inserted everything through Squarespace's browser tools, there might be a couple of things that aren't displaying exactly how you want it. If you're comfortable with CSS, you can make changes directly in Squarespace's Code Injection area, or you can contact a designer. You can also learn more about how to override the Commerce7 styles here.
(If you want to add CSS through "Code Injection", make sure you're adding <style type="text/css"> before your CSS styles start and </style> at the end of them.)
Updated about 1 year ago